Internal Adjustable Rotary Broach Tool Holder Set-Up
Set-Up Off the Machine (V-Block)
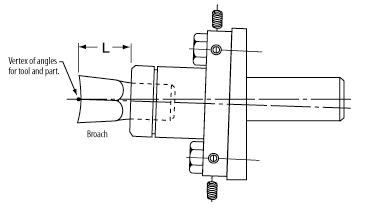
1. Place Rotary Broach into Rotary Broach Tool Holder, measure "L" length and record.

2. Insert setting plug and scribe "L" measurement. (If setting plug is not available, using the Rotary Broach is acceptable)
3. Slightly loosen two (2) hex nuts located on flange of Rotary Broach Tool Holder.
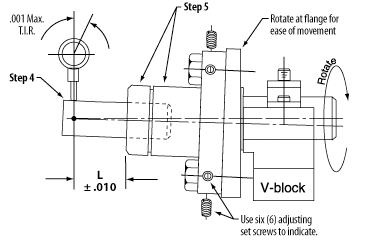
4. Place into a V-block and lightly snug V-block clamp. Set indicator to scribed "L" line on setting plug.

5. Tape live spindle and housing together to rotate tool holder as one piece. Using six (6) adjusting set screws, indicate tool holder to a maximum of .001 total indicator reading. (T.I.R.)
Final Step: Lock two (2) hex nuts; snug all six (6) adjusting screws against studs. Recheck against possible movement, fully insert Rotary Broach into Rotary Broach Tool Holder spindle and lock set screw.
You're ready to begin rotary broaching.
Watch the Internal Adjustable Rotary Broach Tool Holder Set-Up Video
Set-Up on the Machine (Turret Lathe)
1. Place Rotary Broach into Rotary Broach Tool Holder, measure "L" length and record.

2. Insert setting plug and scribe "L" measurement. (We recommend grinding a flat on the shank portion of the tool holder that will correspond to the clamping bolts in your turret. This will reduce the likelihood of the holder spinning in the machine.)
3. Mount the Rotary Broach Tool Holder in the turret and position the tool holder so that the cutting portion of the Rotary Broach ("L" length) is as close to the work zero point as possible.
4. Slightly loosen two (2) hex nuts located on flange of Rotary Broach Tool Holder.
5. Mount a magnetic base dial indicator on the chuck. Using six (6) adjusting set screws, indicate tool holder to a maximum of .001 total indicator reading (T.I.R.) .This is done by rotating the chuck, NOT the Rotary Broach (using a telescoping inspection mirror is recommended).
Final Step: Lock two (2) hex nuts; snug all six (6) adjusting screws against studs. Recheck against possible movement, fully insert Rotary Broach into Rotary Broach Tool Holder spindle and lock set screw.
You're ready to begin rotary broaching.
Watch the Internal Adjustable Rotary Broach Tool Holder Set-Up Video
 Close
Menu